
Turning the M4 Mac Mini into a Local LLM Workhorse
Lessons from the Edge: Turning the M4 Mac Mini into a Local LLM Workhorse
Introduction
I promised to document my experience—here it is. Over the past month I ran a base-spec M4 Mac Mini (512 GB internal SSD, 30 GB unified memory\*¹) with a 4 TB external SSD as both a desktop and an OpenAI-compatible inference server. Spoiler: it’s quiet, frugal, and strong enough for day-to-day private AI workloads.
*¹ Apple hasn’t published granular GPU limits; Activity Monitor shows ~22 GB addressable by the GPU. Your mileage may vary.
1 Why Local LLMs?
- Data sovereignty & GDPR – nothing leaves the building
- Cost certainty – no usage-based billing
- Air-gap option – disable outbound traffic entirely
Telemetry caveat: Ollama and LM Studio collect anonymous stats unless you disable them (OLLAMA_DISABLE_TELEMETRY=1, LM Studio → Settings → Privacy).
2 Boot Options: Internal vs External macOS
I installed macOS 14.5 on a USB-4 4 TB SSD to hot-swap configurations.
- Pros: instant roll-back, sandboxed experiments
- Cons: macOS updates can block the drive if Secure Boot is on Full.
- Fix: Reboot → hold ⌘R → Startup Security Utility → Reduced Security + Allow booting from external media.
Booting internally avoids this hurdle entirely.
3 Toolchain
| Runner | Why I Use It | Key Tweaks |
|---|---|---|
| Ollama | Fast CLI, good model library | zsh mismatches when you change context-size, even with re-configured models. |
| LM Studio | GUI + OpenAI API in one app. Good model library |
Edit ~/.cache/lm-studio/.internal/http-server-config.json:"networkInterface": "0.0.0.0" to bind to all NICs. |
| llama.cpp | Lowest overhead, script-friendly | Compile with make LLAMA_METAL=1 LLAMA_METAL_EMBED=1. Minimal logs: run via -v for more detail. |
For experimentation, testing and interactive as well as server use, LM Studio was my preferred choice.
4 Networking Cheat-Sheet
- Assign the Mac Mini (brainbox.local) a static IP (e.g.,
192.168.0.42). - Add it on clients:
192.168.0.42 brainbox.localin/etc/hosts. - Bonjour works mostly on the same subnet, but static mapping survives VLANs & VPNs.
5 Performance Snapshot (measured with llama-bench)
| Model | Quant. | VRAM (GB) | Tokens / s | Power (W) |
|---|---|---|---|---|
| Mistral-7B-Instruct | Q4_K_M | ≈ 10 | 54 | 28 |
| Qwen-14B-Chat | Q5_K_S | ≈ 19 | 25 | 29 |
| Llama-3–24B | Q4_K_M | ≈ 22 | 12 | 30 |
| (Batch = 1, 4096 ctx, “metal” backend) |
Above 24B the context window or swap hits host RAM and responsiveness drops sharply.
6 System Characteristics
- Power: 6 W idle → 30 W sustained load
- Noise: ≤ 20 dB(A); the fan stays below 2000 RPM
- Footprint: 19 cm square—fits under a monitor stand
7 Typical In-House Use Cases
- Privacy Chat sessions Anything LLM and RAG
- Virtual assistant “Agent Kim” replying to emails (agentic system tasked by [local] e-mail and watched folder)
- Batch embedding for a local semantic-search index
- Document conversion & watermarking
8 CrewAI Configuration Example (most OpenAI-compatible client work) for local processing
import os
os.environ["OPENAI_API_BASE"]  = "http://brainbox:1234/v1"
os.environ["OPENAI_MODEL_NAME"] = "openai/qwen2.5-coder-7b-instruct"
os.environ["OPENAI_API_KEY"]    = "lmstudio_placeholder"  # dummy
os.environ["LITELLM_PROVIDER"]  = "openai-chat"
Swap brainbox for your Mini’s IP/hostname.
9 Takeaways
The base M4 Mac Mini isn’t a GPU monster, but for 7B-to-13B models it feels like a dedicated inference appliance—drawing less power than many laptop chargers. If your data can’t leave the premises (or you’re simply done paying per token), this little box is worth a spot on the desk for less than 1500 € for the hardware.
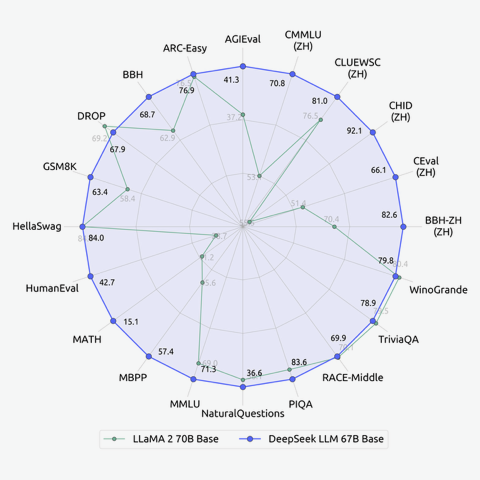
Oilama model classification (Deep Seek)

High-Performance Agent Network with local LLMs
Multi-Agent Systems consist of multiple agents that interact within a shared environment. Each agent typically performs tasks based on its capabilities and objectives. In the context of using LLMs, each agent might employ a model to process information, make decisions, or generate responses based on the data it encounters.
2. Challenge of Resource Constraints
In scenarios where the computational resources (like memory and processing power) are limited, running large-scale models such as a 70-billion parameter LLM is impractical. For instance, a typical machine with 16GB of RAM cannot efficiently load and run a model of this size directly in memory.
3. Specialization of LLMs
Specialized LLMs are tailored or fine-tuned to perform well on specific types of tasks or data domains. This specialization can lead to more efficient processing and better performance on those tasks compared to general-purpose models.
4. Assigning LLMs to Agents
Assigning the right LLM to each agent involves matching the model’s strengths to the agent’s primary tasks. For example, an agent tasked with legal document analysis might be paired with an LLM fine-tuned on legal texts, while another dealing with mathematical problems would utilize a math-oriented LLM.
5. Benefits of Specialized LLM Assignment
Improved Efficiency: Specialized models can be smaller and faster, requiring less memory and computational power, thus better suited for machines with limited resources. Enhanced Performance: Specialization can lead to higher accuracy and faster response times in the domain-specific tasks. Scalability: Smaller, specialized models can be more easily scaled across multiple agents than a single large model. 6. Performance Costs and Model Swapping
Despite the benefits, there are potential costs to this approach:
Model Swapping Overhead: Changing the model an agent uses can incur computational overhead, especially if different tasks require different specializations frequently. Complexity in Management: Maintaining multiple specialized models and deciding when to swap them based on the agent’s current task can complicate the system’s architecture. 7. Creating a High-Performance Agent Network
By carefully selecting and matching specialized LLMs to agents’ tasks, it’s possible to create a network of agents that collectively performs at a level comparable to more powerful models like GPT-4. This involves strategic allocation where each agent operates within its domain of expertise, potentially leading to a highly efficient and effective system.
8. Considerations for Implementation
Resource Allocation: Deciding how to allocate limited memory and compute resources across agents and models. Model Selection: Choosing the right models for specialization based on the tasks and data each agent handles. Dynamic Adaptation: Developing mechanisms for dynamically adapting model assignments based on changing tasks or conditions in the environment. Conclusion
In environments constrained by hardware capabilities, leveraging specialized LLMs in a multi-agent framework offers a viable path to achieving high efficiency and effectiveness. Careful planning in model assignment and management can mitigate the downsides of model swapping, leading to a robust system capable of handling complex tasks with limited resources.
Web scraping with bs4 fails with error 403
import requests from bs4 import BeautifulSoup
# Send an HTTP request to the website and get the HTML response —> headers = {“user-agent”: “Mozilla/5.0 (Windows NT 10.0; Win64; x64) AppleWebKit/537.36 (KHTML, like Gecko) Chrome/88.0.4324.182 Safari/537.36”} url = “https://siebeneicher.com” # response = requests.get(url) response = requests.get(url,headers=headers)
OLLAMA server and directory
Nextcloud client on Synology NAS
Your WebDAV URL is: example.com/nextcloud/remote.php/dav/files/USERNAME
(replace USERNAME with your username on your nextcloud instance)
Install ‘Cloud Sync’. Add an Agent Select ‘WebDAV’ Add the URL for your NextCloud WebDAV link and credentials Select where to sync to (I created a share for that with a folder structure like “name\nextcloud” in it) The rest of the options should self explanitory.
Colima Docker and Python
Autogen RuntimeError: Code execution is set to be run in docker (default behaviour) but docker is not running. The options available are: – Make sure docker is running (advised approach for code execution) – Set “use_docker”: False in code_execution_config
This may help: sudo ln -sf $HOME/.colima/default/docker.sock /var/run/docker.sock

Large Language Models Database
This is an fantastic website
> www.hardware-corner.net/llm-database/


AI: Offline Quality Image-to-Text runs on Laptop
Image Management with Quantized LLMs: A Leap in Efficiency, Accessibility and Privacy
The challenge of managing extensive digital image libraries is a universal one, efficiently organizing and retrieving images from large collections is a task that transcends professional boundaries. The advent of quantized Large Language Models (LLMs), particularly the LLaMA model, has introduced a groundbreaking solution for “Image to Text” that is far beyond keywording and both efficient and accessible, even on standard computing hardware like a MacBook Pro.
To keep the whole process ‘in-house’ has significant privacy and confidentiality benefits.
Another often-overlooked aspect of digital image management, particularly crucial for website design and content creation, is (web) accessibility for the visually impaired. Image captions, which provide a textual description of the visual content, are essential for making content more inclusive.
The Universal Challenge of Image Management
Recognising image contents (Image to Text) in a searchable and interpretable format is the next leap. The need for an automated, efficient, and privacy-conscious solution is widely felt. However, the resource requirements of large language models were often a limiting factor as either considerable in-house investment was required or data had to be entrusted to external service providers.
The Power of Quantized LLMs in Image Processing
Quantized LLMs, such as the LLaMA model, can represent a significant advancement for digital asset management. Model quantization is a technique used to reduce the size of large neural networks by modifying the precision of their weights. This process involves converting the weights of the model from higher precision data types (like float32) to lower-precision ones (like INT4), effectively shrinking the model’s size and making it feasible to run on less powerful hardware, even on a Laptop like a MacBook Pro with 16GB of memory which was used for this demonstration.
Key Benefits of Quantization for Image Management
- Reduced Hardware Demands: By lowering the precision of the model’s weights, quantization allows the LLaMA model to run efficiently on commonly available hardware, making this technology more accessible.
- Maintained Performance: Despite the reduction in size, quantized models like LLaMA maintain a high level of accuracy and capability, crucial for detailed image description and organization.
- Enhanced Privacy: Local processing of images with quantized LLMs ensures that sensitive data remains within the user’s system, addressing major privacy concerns.
- Time Efficiency: The script processes images in about 15 seconds each, a testament to the efficiency of quantized models in handling complex tasks quickly.
Practical Application and Efficiency
A script has been developed that leverages a Large Language Model to automatically generate and embed detailed descriptions into images from various sources, including files, directories, and URLs. This tool processes both RAW and standard image formats, converting them as needed and storing the AI-generated content descriptions in both text files and image metadata (XMP files) for enhanced content recognition and management. The practical application of this script on a MacBook Pro demonstrates the efficiency of quantized LLMs. The balance between performance and resource requirements means that advanced image processing and organization are now more accessible than ever. Batch processing of 1000 local images files took approximately 15 seconds per image.
Script utilising llama.cpp for image library management
#!/bin/bash

# Enhanced script to describe an image and handle various input/output methods
# file, path-to-files, url
# requires exiftools, llama.cpp
# User should set these paths before running the script
LLAVA_BIN="YOUR_PATH_TO_LLAVA_CLI"
MODELS_DIR="YOUR_PATH_TO_MODELS_DIR"
MODEL="YOUR_MODEL_NAME"
MMPROJ="YOUR_MMPROJ_NAME"

TOKENS=256
THREADS=8
MTEMP=0.1
MPROMPT="Describe the image in as much detail as possible."
MCONTEXT=2048
GPULAYERS=50

# Function to process an image file
process_image() {
    local image_file=$1
    local output_file="${image_file%.*}.txt"
    local xmp_file="${image_file%.*}.xmp"

    OUTPUT="$(${LLAVA_BIN} -m ${MODELS_DIR}/${MODEL} --mmproj ${MODELS_DIR}/${MMPROJ} --threads ${THREADS} --temp ${MTEMP} --prompt "${MPROMPT}" --image "${image_file}" --n-gpu-layers ${GPULAYERS} --ctx-size ${MCONTEXT} --n-predict ${TOKENS})"
    RES=$(echo "$OUTPUT" | awk '/ per image patch\)/{p=1;next} p')

    # Remove leading and trailing whitespace
    RES="${RES#"${RES%%[![:space:]]*}"}"
    RES="${RES%"${RES##*[![:space:]]}"}"

    # Output handling
    if [[ $input_source == "file" ]]; then
        echo "$RES" > "$output_file"
        # Check if XMP file exists, if not create it
        if [[ ! -f "$xmp_file" ]]; then
            exiftool -xmp -o "$xmp_file" "$image_file"
        fi
        # Write the description to the XMP file
        if [[ -f "$xmp_file" ]]; then
            exiftool -XMP-dc:Description="$RES" "$xmp_file"
        else
            exiftool -XMP-dc:Description="$RES" "$image_file"
        fi
    elif [[ $input_source == "url" ]]; then
        echo "$RES" | pbcopy
    fi
}

# Export the function so it's available in subshells
export -f process_image

# Function to process a directory
process_directory() {
    local dir=$1
    while IFS= read -r -d '' file; do
        # Check if MODELS_DIR exists
        if [[ ! -d "$MODELS_DIR" ]]; then
            echo "Error: MODELS_DIR ($MODELS_DIR) not found. Exiting."
            exit 1
        fi
        process_image "$file" "file"
    done < <(find "$dir" -type f \( -iname "*.jpg" -o -iname "*.png" -o -iname "*.gif" -o -iname "*.tiff" \) -print0)
}

# Function to download and process an image from a URL
process_url() {
    local url=$1
    local temp_dir=$(mktemp -d)
    local temp_file="${temp_dir}/image"

    curl -s -o "$temp_file" "$url" && process_image "$temp_file" "url"
    rm -rf "$temp_dir"
}

# Main script logic
input=$1

if [[ -f $input ]]; then
    input_source="file"
    process_image "$input"
elif [[ -d $input ]]; then
    input_source="file"
    process_directory "$input"
elif [[ $input =~ ^https?:// ]]; then
    input_source="url"
    process_url "$input"
else
    echo "Invalid input. Please provide a valid file, directory, or URL."
    exit 1
fi
Examples
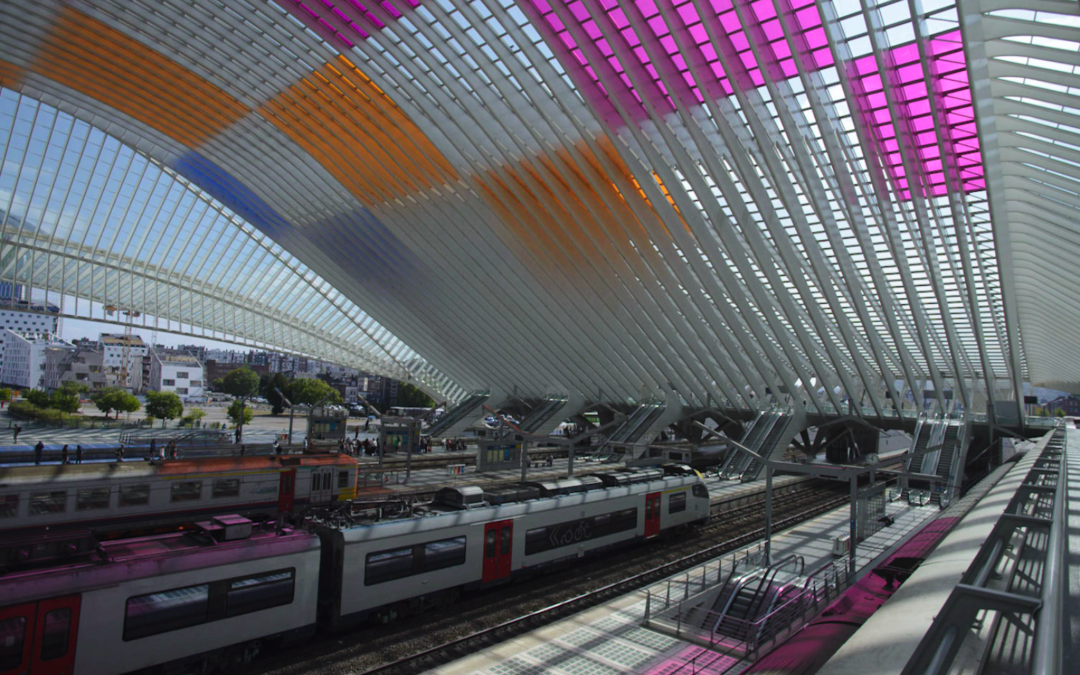
Example Image 1:
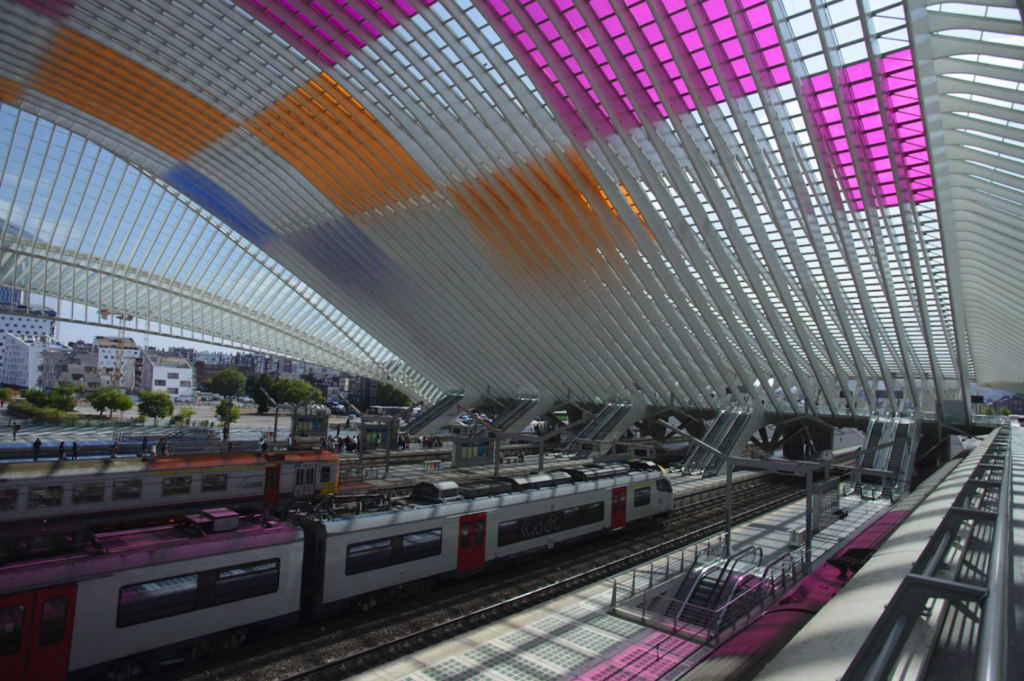

Model Generated Description: The image features a train station with a large train parked on the tracks. The train spans a significant portion of the scene, stretching from the left to the right side. There are several other trains visible in the background, indicating a busy train station.
In addition to the trains, there are multiple people scattered throughout the scene, likely waiting for their trains or attending to other tasks at the station. Some of these individuals are closer to the foreground, while others are further back in the scene.
The overall atmosphere of the image suggests a bustling and active train station, with various trains and people contributing to the busy environment.
Example Image 2:

Model Generated Description: The image features a large statue of a cat holding a fork and knife in its paws. The cat statue is positioned in the middle of the scene, with the fork and knife held prominently in its hands. The statue appears to be made of metal, giving it a unique and artistic appearance.In the background, there are trees visible, adding a natural element to the scene. The combination of the cat statue and the surrounding environment creates an interesting and visually appealing composition.
Remark: It is not error-free. There is no knife in the paw, it is a fold of the coat.
Conclusion
The integration of quantized LLMs like LLaMA in image management is a transformative development, making advanced digital asset organization accessible on standard hardware and ensuring data privacy. This approach represents a significant leap forward, offering a powerful, user-friendly solution for a wide range of users and scenarios.
*Note: For those interested in exploring this solution further or seeking assistance with similar challenges, consultancy services are available. These services provide expertise in integrating and customizing such technologies to suit a variety of needs and preferences. Feel free to contact me at hello@c-7.de. Claus Siebeneicher *