Plesk Fwd: Unable to configure a web server on the host
> Subject: Unable to configure a web server on the host xxxx > > Unable to generate the web server configuration file on the host <> because of the following errors: > > Template_Exception: AH00526: Syntax error on line 24 of /etc/apache2/modsecurity.d/rules/tortix/modsec/tortix_waf.conf: > ModSecurity: failed to load IPs from: /etc/asl/whitelist Could not open ipmatch file “/etc/asl/whitelist”: No such file or directory > > file: /opt/psa/admin/plib/Template/Writer/Webserver/Abstract.php > line: 75 > code: 0 > > Please resolve the errors in web server configuration templates and generate the file again.
Keine Verbindung mit Safari oder anderen
mobil
Chat-GPT: Beyond Copywriting, Storytelling and Excel. The Reincarnation of Scripting?
Those who know me are aware of my passion for photography. It brings me joy when others show interest in my pictures. And I want to present (and sell) them. Visualizing how the colorful images would look on walls is truly exciting.
To that end, I have created various platforms, from traditional photo gallery views to augmented reality and virtual exhibitions. However, what was missing were simple showrooms that demonstrate how my pictures would appear in decorated spaces.
I have been involved in the early days of personal computing, and I never lost touch with programming. While I may be a bit rusty in certain areas, I still possess knowledge in shell scripting, C, and Python, albeit not as proficiently as before. I might not be aware of the latest libraries for Python and have to look up methods of OpenCV constantly. Nevertheless, it suffices for my personal needs and I have the advantage to look at problems holistically. I always have more ideas than I can implement or even try out. However, implementation is often time-consuming and sometimes tedious.
And this is where Chat-GPT comes into play.
I have been following the development of GPT-J for around two years, utilizing it for storytelling purposes.
But Chat-GPT is a dream come true: finally, I can focus on my ideas without the hassle of being held up too much with implementation.
Chat-GPT as a Programming Assistant and Freelance Programmer
One of my previous jobs involved developing system architectures and as part of this translating operational requirements into technical system specifications, this comes in handy now.
An Experiment with Chat-GPT
Objective
Presenting my images from the “EuropasFarben” series as captivating reels on social media.
Task
The idea is to showcase selected images in various room templates and create a video clip that can be shared on social media.
Starting Point
I already have room photos and, of course, the EuropasFarben images. I manually determined the positions where the EuropasFarben images should be placed within each room template.
Now I need the following steps
- Selecting the images that best complement each room.
- Embedding these images into the room templates.
- Compiling a video clip from the results (guideline: display each image for 0.2 seconds, except for the last one, which should be shown for 5 seconds).
Implementation
To achieve this, I had Chat-GPT write three scripts: two Bash scripts and one Python program.
The first script identifies the three most suitable (in terms of color and pattern) rooms for each image. Then, the room template and the most fitting image are combined to create a new image. Finally, a specific number of images are compiled into a video clip.
All of this is automated, allowing hundreds of images to be processed within seconds. Changes, such as adding new rooms or adjusting the presentation frequency, can be easily made at any time.
With Chat-GPT as my programming assistant, I now have the ability to bring my ideas to life without significant effort and present my images in an impressive manner.
The CHAT-GPT Starting points
Image Overlay with ImageMagick
Write a script in zsh that takes two input images (referred to a base_image and overlay_image) that inserts overlay_image into base_image at position_x and position_y (in pixel) using imagemagick / convert. The dimensions (in pixel) of base_image remain unaltered, overlay_image shall be scaled to with_x or height_y (whichever fits best) without changing the aspect ratio. base_image, overlay_image, position_x, position_y, with_x and with_y shall be command line parameters. Ask if more information is needed.
Find Color-Harmony Pictures
Write a script that reads the photo of a room and a directory with possible images that are candidates to be hung in this room. Scan through all the files of images in this directory and find the 10 best matching pictures for this room applying color harmony rules
Create Video from Images
(this is already a revised version of the requirements document, the first attempt is lost). Create a python script to create a video from images: Random Image Selection: The script randomly selects a specified number of images from a given folder. The images can be in either JPG or PNG format. Image Display Duration: Each image is displayed in the video clip for a specified duration, except for the last image which is displayed for a longer duration. Last Image Display: The last image in the clip is displayed for 5 seconds to provide emphasis. Filename Display: Two seconds after the display of the last image starts, the filename of the last image (without the extension) is displayed at the bottom of the video clip. Readability Enhancement: A tray background is added behind the filename text to improve its readability. CLI Configurability: The script allows the user to configure various parameters through command-line arguments. The supported arguments include the image folder path, output file path, duration for each image display, and the number of images in the clip. Exclusion of Last Image: The script ensures that the last image shown in a previous run is excluded from the current run to avoid repetition. Output Format: The final video clip is saved in MP4 format using the H.264 codec.
Half an afternoon for iterations and production
With these basic requirements we (me and CHAT-GPT) went into a few iterations the SCRUM style, quickly reworked some issues and at the end of the afternoon I had 356 video clips ready. The final requirements are summed up below.
The Chat-GPT end points
Documentation
For the final version of each script, CHAT-GPT is asked to: Output the functionality of this script that it can be used as requirements document for re-creating it.
Certainly! Here’s the script functionality presented in a format that can serve as a requirements document for re-creating it:
Image Overlay Script – Requirements Document
Objective
The objective of this script is to overlay an image onto another image while applying a frame and shadow effect.
Features
- Accept two input images: a base image and an overlay image.
- Allow specifying the position coordinates and dimensions of the overlay image.
- If position coordinates and dimensions are not provided as command-line arguments, attempt to read them from a text file with the same filename as the base image but with the extension ‘txt’.
- Scale the overlay image while maintaining its aspect ratio to fit within the specified dimensions.
- Add a 20-pixel wide dark gray frame to the overlay image.
- Apply a shadow effect to the framed overlay image.
- Generate the output filename based on the overlay and base image filenames.
- Save the resulting composite image in a “compositions” directory.
- Clean up temporary files after the operation is complete.
Dependencies
- ImageMagick: The script relies on the ImageMagick command-line tool for image manipulation operations. Ensure ImageMagick is installed on the system before running the script.
Usage
The script accepts the following command-line parameters:
- Base image: The path to the base image file (JPEG format).
- Overlay image: The path to the overlay image file (PNG format).
- (Optional) Position X: The X-coordinate position of the overlay image on the base image (in pixels).
- (Optional) Position Y: The Y-coordinate position of the overlay image on the base image (in pixels).
- (Optional) Width X: The desired width of the overlay image (in pixels).
- (Optional) Width Y: The desired height of the overlay image (in pixels).
If any of the position and dimension parameters are not provided, the script attempts to read them from a text file with the same filename as the base image but with the extension ‘txt’.
The output file will be saved in the “compositions” directory with a filename based on the overlay and base image names.
To run the script, use the following command:
./overlay_script.sh base_image.jpg overlay_image.png [position_x position_y with_x with_y]
Limitations
- The script assumes the input images are in the JPEG and PNG formats. Adjustments may be necessary for other image formats.
- It is the user’s responsibility to ensure the input images have compatible dimensions and formats for proper overlaying.
- The script relies on ImageMagick, so it must be installed and accessible in the system’s PATH for the script to work correctly.
Future Enhancements
- Provide additional options for adjusting the frame and shadow parameters.
- Support more image formats and allow the user to specify the output format.
- Implement error handling and validation for better user feedback.
By following these requirements, one should be able to re-create the image overlay script with the desired functionality.
Room Image Matching Script – Requirements Document
Introduction
The Room Image Matching script is designed to find the best matching rooms for a given candidate image or directory of candidate images based on color harmony and contrast. It aims to assist in the selection of suitable room images that match the color scheme of a given candidate image.
Features
- Accepts a candidate image or directory of candidate images as input.
- Accepts a directory containing room images.
- Calculates color histograms for both the candidate image(s) and room images.
- Computes color harmony and contrast scores for each room based on the candidate image(s).
- Identifies the top matching rooms based on the scores.
- Prints the filenames of the best matching rooms and their corresponding scores.
- Copies the candidate image(s) to the respective room directories.
Usage
The script can be executed using the following command-line syntax:
python room_image_matching.py candidate_path room_directory [--num_rooms NUM_ROOMS]
Arguments
candidate_path: Path to the candidate image or directory containing candidate images.room_directory: Directory containing the room images.--num_rooms NUM_ROOMS(optional): Number of top matching rooms to find (default: 10).
Algorithm
- Read the candidate image or scan through all images in the candidate directory.
- Calculate the color histograms for the candidate image(s) and room images.
- For each candidate image, compare the color histograms with the room images to calculate color harmony and contrast scores.
- Combine the scores to determine the overall suitability of each room for the candidate image.
- Select the top
num_roomsrooms with the highest scores as the best matching rooms. - Print the results, showing the filenames of the best matching rooms and their corresponding scores.
- Copy the candidate image(s) to the respective room directories in a subdirectory named ‘candidates’.
Dependencies
The script relies on the following dependencies:
- OpenCV
- NumPy
- scikit-image
- scikit-learn
Ensure that these dependencies are installed before running the script.
Example Usage
To find the best matching rooms for a single candidate image:
python room_image_matching.py path/to/candidate_image.jpg path/to/room_images
To find the best matching rooms for all images in a candidate directory:
python room_image_matching.py path/to/candidate_directory path/to/room_images
The script will display the top matching rooms for each candidate image and copy the candidate images to the corresponding room directories under the ‘candidates’ subdirectory.
That covers the functionality of the Room Image Matching script as a requirements document. You can use this document to re-create the script accurately or refer to it for understanding the script’s purpose and behavior.
make_clip_con.py Requirements
Description
The make_clip_con.py script is designed to create a video from a specified number of random images selected from a given folder. The script provides flexibility in terms of image selection, display duration, and output configuration.
Functional Requirements
- Random Image Selection
- The script shall randomly select a specified number of images from a given folder.
- The images can be in either JPG or PNG format.
- Image Display Duration
- Each image shall be displayed in the video clip for a specified duration.
- The duration for each image display can be configured.
- Last Image Display
- The last image in the clip shall be displayed for a longer duration to provide emphasis.
- The duration for the last image display shall be configurable.
- Exclusion of Last Image
- The script shall keep track of the last image shown in a previous run.
- The last image shall be excluded from the current run to avoid repetition.
- Filename Display
- Two seconds after the display of the last image starts, the filename of the last image (without the extension) shall be displayed at the bottom of the video clip.
- The filename display shall be readable and distinguishable.
- Output Format
- The final video clip shall be saved in MP4 format using the H.264 codec.
- CLI Configurability
- The script shall allow the user to configure various parameters through command-line arguments.
- Supported arguments shall include the image folder path, output file path, duration for each image display, and the number of images in the clip.
- Configuration Persistence
- The script shall use a configuration file to store the state and settings of the application.
- The configuration file shall be created if it doesn’t exist.
- The configuration file shall store information such as the last images shown to avoid repetition.
Non-Functional Requirements
- Reliability
- The script shall handle various scenarios, such as insufficient number of images in the folder, gracefully and provide appropriate feedback to the user.
- Usability
- The script shall provide clear and concise usage instructions for running the program.
- The command-line arguments and their functionality shall be documented.
- Portability
- The script shall be written in Python to ensure cross-platform compatibility.
- The script shall run on major operating systems, including Windows, macOS, and Linux.
You can use this requirements document as a guide for re-creating the make_clip_con.py script, ensuring that all the necessary functionality and features are implemented according to the specified requirements.
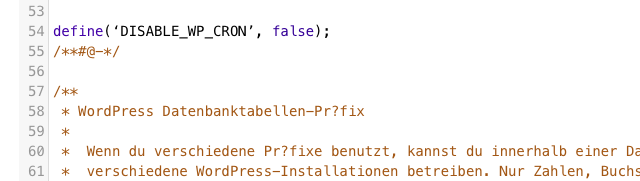
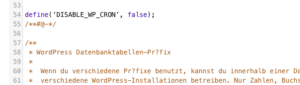
Rätselhafter Fehler nach WordPress Update – Mysterious Error after WordPress Update
Mysterious Error after WordPress Update to 6.2: Website Stays Blank!After updating WordPress to version 6.2, a mysterious error occurred causing the website to remain blank. Upon a quick investigation, it was discovered that the issue resided in the wp-config.php file. It was an uncommon error that could have taken hours of searching without much luck to identify. The problem lied in a specific line of the configuration file where incorrect quotation marks were used. These were not recognized as valid by the PHP interpreter, resulting in an error message.
Error wp-config.php define …
 

“Schauen Sie auch in den SPAM Ordner” ist eine technische Offenbarung … das muß nicht sein!
Eine der grundlegenden Einstellungen, die Sie für Ihre E-Mail-Konfiguration einrichten sollten, ist das Sender Policy Framework (SPF). SPF ist ein DNS-Eintrag, der die Domänen-Authentifizierung prüft, indem er die IP-Adressen der Server identifiziert, die für das Senden von E-Mails für Ihre Domäne autorisiert sind. Dies hilft, E-Mail-Spoofing zu verhindern, indem es den Empfängern zeigt, dass die E-Mail von einem authentifizierten Server stammt und nicht von einem betrügerischen Quellserver.
Ein weiteres wichtiges Tool für die E-Mail-Konfiguration ist das Domain-based Message Authentication, Reporting and Conformance (DMARC). DMARC ist ein DNS-Eintrag, der die Verwendung von SPF und DomainKeys Identified Mail (DKIM) für die E-Mail-Authentifizierung zusammenführt und sicherstellt, dass Ihre E-Mails von den empfangenden E-Mail-Servern überprüft werden können. DMARC hilft dabei, E-Mail-Betrug zu verhindern, indem es eine Richtlinie für die Behandlung von E-Mails festlegt, die von nicht autorisierten Quellen stammen.
Eine fehlerhafte oder fehlende SPF- oder DMARC-Konfiguration kann dazu führen, dass Ihre E-Mails als Spam oder sogar als Phishing-Versuche klassifiziert werden. Dies kann dazu führen, dass Ihre E-Mails von Empfängern abgelehnt oder in den Spam-Ordner verschoben werden. Eine korrekt konfigurierte SPF- und DMARC-Konfiguration hilft jedoch dabei, sicherzustellen, dass Ihre E-Mails sicher zugestellt werden und nicht fälschlicherweise als Spam oder Phishing-Versuch erkannt werden.
Zusammenfassend ist eine gute Konfiguration der Mail-Server mit SPF- und DMARC-Einstellungen von entscheidender Bedeutung für die Sicherheit Ihrer E-Mails und die Vermeidung von Spam- oder Phishing-Klassifizierungen. Stellen Sie sicher, dass Sie diese Konfigurationen korrekt einrichten und überwachen, um Ihre E-Mail-Kommunikation zu schützen.
Ich kann bei der Konfiguration helfen, sprechen Sie mich an.
Google Fonts – WordPress, Divi und GDPR / DSGVO
Google Fonts ist eine der beliebtesten Bibliotheken für Schriftarten im Web. Viele Website-Betreiber nutzen Google Fonts, um ihre Website optisch ansprechender zu gestalten und eine bessere Lesbarkeit zu erreichen. Allerdings haben einige Datenschutzexperten Bedenken hinsichtlich der Verwendung von Google Fonts geäußert.
Das Problem mit Google Fonts und GDPR ist, dass die Schriftarten von den Servern von Google geladen werden müssen. Dadurch werden personenbezogene Daten wie IP-Adressen und Browserinformationen an Google übermittelt. Dies kann dazu führen, dass Google in der Lage ist, das Verhalten der Nutzer zu verfolgen und Daten zu sammeln, ohne dass diese es wissen oder zustimmen.
Obwohl Google Fonts eine weit verbreitete und praktische Lösung ist, gibt es Alternativen, die die Datenschutzanforderungen von GDPR erfüllen. Eine Möglichkeit ist, Schriftarten lokal auf dem Server zu hosten und nicht von externen Quellen wie Google Fonts zu laden. Dadurch können Website-Betreiber die Kontrolle über die Daten behalten, die an Dritte übermittelt werden.
Es ist auch möglich, Google Fonts unter Verwendung von Technologien wie Content Delivery Networks (CDNs) oder Proxy-Servern zu verwenden. Diese Technologien können dazu beitragen, die Übermittlung von personenbezogenen Daten an Google zu minimieren und den Datenschutz zu verbessern.
Es ist wichtig zu beachten, dass die Verwendung von Google Fonts nicht automatisch gegen GDPR verstößt. Vielmehr hängt es von den Umständen und der Art der Verwendung ab. Website-Betreiber sollten jedoch sicherstellen, dass sie die erforderlichen Schritte unternehmen, um sicherzustellen, dass sie die Datenschutzanforderungen von GDPR erfüllen.
Insgesamt gibt es keine einfache Antwort auf die GDPR-Problematik von Google Fonts. Website-Betreiber müssen sorgfältig abwägen, welche Optionen für sie am besten geeignet sind, um sowohl das Erscheinungsbild ihrer Website zu verbessern als auch die Datenschutzanforderungen von GDPR zu erfüllen.
Durch das lokale Einbinden von Google-Fonts ist man auf der sicheren Seite.
Tools helfen dabei!
gwfh.mranftl.com/fonts/nokora?subsets=latin <gwfh.mranftl.com/fonts/nokora?subsets=latin>
WordPress (Plesk) verhält sich seltsam
Einblick in die Protokoll Dateien gibt Aufschluss: So – oder so ähnlich…. PHP Fatal error: Allowed memory size of 134,217,728 bytes exhausted..
Unter Tools und Einstellungen -> PHP Einstellungen das Memory Limit heraufsetzen
; Maximum amount of memory a script may consume ; php.net/memory-limit memory_limit = 256M
Und dann anschließend auch unter Domainverwaltung in den PHP Einstellungen
Bei Fragen einfach Kontakt aufnehmen, ich helfe gern
RTBF Classic-21 stream

Putting text and QR code on image with ImageMagick
Step 2: add the caption to the qr code convert -caption “Siebeneicher.com” qr.jpg -gravity center -background black +polaroid anno_polaroid.png
Step 3: put it on all jpg files in folder for i in *.jpg; do composite -gravity SouthEast anno_polaroid.png $i $i”_composite.png”; done
Result:

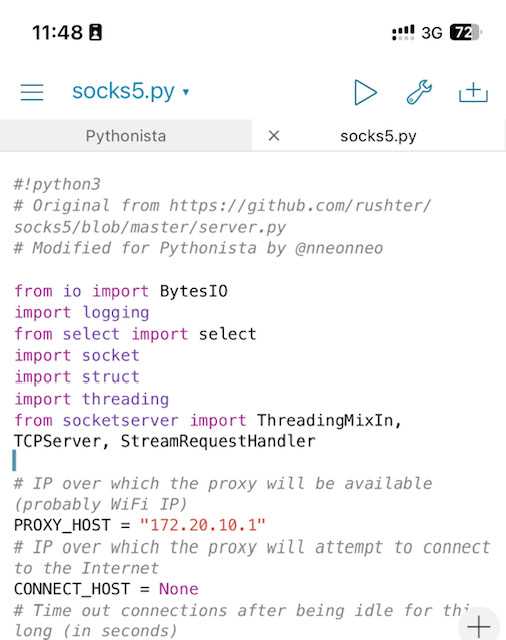
Tethering Sperre umgehen bei iOS
|
|
Funktioniert wunderbar